A lot of people have tread this ground before, is there really anything left to add?
There’s a lot of open source hash map implementations out there already. For example, here’s a fairly comprehensive benchmark on a bunch of them: Comprehensive Hash Map Benchmark. That benchmark compares insert, erase, and lookup performance across 15 different hashmap implementations that are written in both C and C++. I’ll be honest, if you’re thinking about implementing your own non-threadsafe version of a hash map. You really shouldn’t bother unless you have a very specific requirement that isn’t handled by an open source project. But if there’s one thing you can definitely gleam from that benchmark, std::unordered_map is significantly slower than the top-contenders for hash map implementations.
But when it comes to Parallel Hash Maps, there’s less tread ground for benchmarking.
One article I found related to parallel hash map performance was written here: PHMap Performance. Then the hash map from that article is compared against another parallel hash map written here: Parlay Hash Map. Which then compares itself against another parallel hash map written here: Folly Concurrent Hash Map. Parlay Hash Map says it’s the best, but is that really true? Many times you can find yourself in a situation where your particular constraints allow you to optimize in ways you can’t for something that needs to be released to a general audience. Or you just have project requirements that are broken by a particular implementation.
That being said, I was still inspired to try writing my own parallel hashmap implementation to see if I could implement something better than other open source projects for my particular needs.Which meant I needed to create my own benchmark and do my own testing.
Benchmarking setup
Requirements
When benchmarking, it’s always best to start by figuring out the requirements of the system you’re working with. In my case, here are my requirements.
The hash map must allow concurrent inserts, deletes, and lookups to all be possible in parallel.
It’s easier to write code that does manipulations at a per-element level (like “Read value X”, “Do operation that then stores value Y”) than it is to have to process everything in batches. While batching is generally more efficient, it can also make code harder to follow, and it’s also important to make it easy to write and read the code, and only optimize the things that need to be optimized.
Iterating across the hashmap does not need to be able to run in parallel with other operations
Most data structures don’t support modifications during iteration even in single-threaded circumstances. To do so here would be a pretty hefty lift and would probably never be needed.
The memory address of the stored value must never change.
It just makes stuff easier to work with if you don’t have to consider the possibility that a future addition to the hashmap would invalidate a stored reference. In general, I like to avoid long-lived pointers, but there are times when we want to cache or hold onto a reference for efficiency, and we don’t want to perform a lookup every time we need to see a value that never changes.
There must be an interface for a custom allocator
While memory allocation strategies are often part of how a certain hash map gets its efficiency, there needs to be a way to override that behavior. The most direct need in my mind is that I want a place to be able to label my memory allocations for optimizing memory usage later on. Sure there are memory profilers and things to manage that, but they often work just from a stack trace, and it can be very difficult to parse that trace to get useful information like “How much memory is System A using”. But that’s a topic for another time. Also, if I can benchmark all the hash maps against the same allocation strategy, then it removes a variable from the comparison since I can be assured that that piece of the benchmark is the same across all implementations.
There must be an interface for a custom hash function
There are other systems that will need to hash things and compare hashes and it helps for the sake of consistency if the hash in the hashmap matches those other systems. It also eliminates another point of noise when benchmarking different hash map implementations.
Need good performance at low thread counts and smaller map sizes too
Some parallel hash map implementations are focused on their ability to create hash maps with millions of elements and hundreds of threads better than anyone else. But we’re working in an environment where we expect to be working with lots of smaller lists and sets. Also, many times, only 2-4 threads will probably be working with those hash maps. So, good performance at lower thread counts is critical.
You’ll notice that I didn’t mention low memory usage as a requirement
For the purpose of this test, I’m just interested in something fast. Memory usage is an important consideration in a lot of cases. But when working in games, which this blog is focused on, speed tends to trump memory requirements since many times there’s plenty of memory to spare. If this was something that needed to run on a GPU, then that wouldn’t be the case. Also, when an implementation starts to approach memory consumption issues, then the solutions tend to involve higher level strategies like culling or dynamic loading and unloading. Or they get really fine-grained and focus on bit packing and dense arrays or precomputed lookup tables. The size of a general use hashmap tends to not be the concern. At least in my experience.
Tests
For all tests, they were performed with 64 bit integer keys and the values were either 64 bit integers or a struct that contained several different primitive types and an std::string. For many of the hashmaps tested, I also included variations where there was no internal locking. Instead it was just putting a lock around a traditional synchronous hash map. The reason being that I wanted to test if spending all this time on a concurrent hash map makes sense or are the operations small enough that it’s more efficient to just lock the entire operation.
Insert Performance
Performed two types of tests. In one test the keys were all sequential integers. This tests the scenario where there are no double-inserts. The other test used randomly generated keys within fixed range so that there would be some conflicts during insertion at random times.
Lookup Performance
Performed three types of tests. In one test the keys were all sequential integers and looked up as sequential integers so there would be no double-inserts and every lookup would succeed. The other used random within a fixed range so there would be double inserts and failed lookups, but approximately 10-20% would have collisions. The final one would only insert numbers between 0 to 100, which would be almost entirely key conflicts and failed lookups.
Erase Performance
Only one type of test was performed. All keys were sequential integers so there were no failed erases.
Mixed Operation Performance
There were three types of tests performed in this category. All of them simulated attempting to read and write to the hash map at the same time. The tests had the following mixtures:
- 90% Reads 10% Inserts
- 50% Reads 50% Inserts
- 50% Reads 40% Inserts 10% Erases
Rekey Performance
There was one type of test performed where all keys inserted were sequential integers and each key was changed to another key that was a fixed offset from the original with no possibility of key conflicts or failures. The goal here was to simulate structures like spatial hashes where a key can be a position, and oftentimes we want to adjust the key without reallocating the value element.
Iteration Performance
These are the only purely single threaded tests. They test the performance of iterating across the hash map synchronously. It’s not uncommon to use a hash map for getting a set of unique items to iterate across, so this helps simulate that scenario.
Batched Operation Performance
While this doesn’t necessarily meet my primary use cases of a general purpose, easy to use, threadsafe hash map, a lot of these hash map implementations are built around being used for batch processed tasks. So, we also wanted to check the performance of a batched insert and lookup.
What was my implementation strategy
Keep it simple
Open source hash map implementations can sometimes have practically unreadable code since they’re employing a lot of tricks to get the compiler to write faster code. They also generally have complex interfaces since they want to manage things like custom hash functions, custom allocators, multiple growth strategies, etc. I want to know if the compiler tricks actually make a difference for my use case and if those complexities lead to reduced performance that could be avoided in a targeted case. Also, one of the main advantages of writing a data structure oneself is that they can maintain it and extend it when needed. If the code is complex, then that maintenance is expensive, and it becomes more efficient from a development standpoint to just use the open source code.
What does that mean in practice
It means the basic bones of the hash map are implemented a lot like this one: Designing a Hash Map from Scratch. I.e. There’s a table of buckets, each bucket is a linked list, adding and removing elements is mainly bucket index lookups and linked list operations.
No configuration necessary
An extension of ‘keep it simple’, if we’re writing code for ourselves, then we can strip out complexity by having something easy to use. Now, it’s typical to have a ‘using’ or ‘typedef’ call around some complex hash map type to keep those simple. But the more and more template variables you abstract away, the more and more likely you’ll be in a situation where you have some variable in the debugger where the typename is unreadable because it’s templates in templates in templates. If we’re making our own data structure, then we can make the type only have the few configuration variables we actually need.
What does that mean in practice
It means the lock type we’re using isn’t a template parameter, nor is the allocation strategy, nor is the hash function. For the other hash maps, I needed to make wrappers around allocating and deallocating nodes or I needed to specify the hash function in a template parameter.
Employ high level optimizations that the other implementations use
Many open source hash map implementations have articles or papers on why they’re so fast. So, if there’s a high level description of their optimizations and they don’t violate the ‘keep it simple’ rule. Then I’ll apply those optimizations.
What does that mean in practice
I’ve added the submap concept that’s described in Parallel Hash Map. I’ve also made the size of the bucket lists to be a power of two, so that I can do a fast modulus. There’s a description of the fast power of two modulus in this article on Fibonacci Hashing. The reason I’m not using a fibonacci hash is because I already am using a hash algorithm which is common across the whole benchmark.
Test quickly to abandon bad ideas quickly
This endeavor became a bit of a rabbit hole as I had more and more optimization ideas. To make sure I wasn’t spending a bunch of time on pointless things, I decided to just test things to see if they made sense, and abandoned ones that didn’t.
What I learned from these ideas
There’s little to gain from trying to improve parallelism of a linked list of 1 or 2 elements
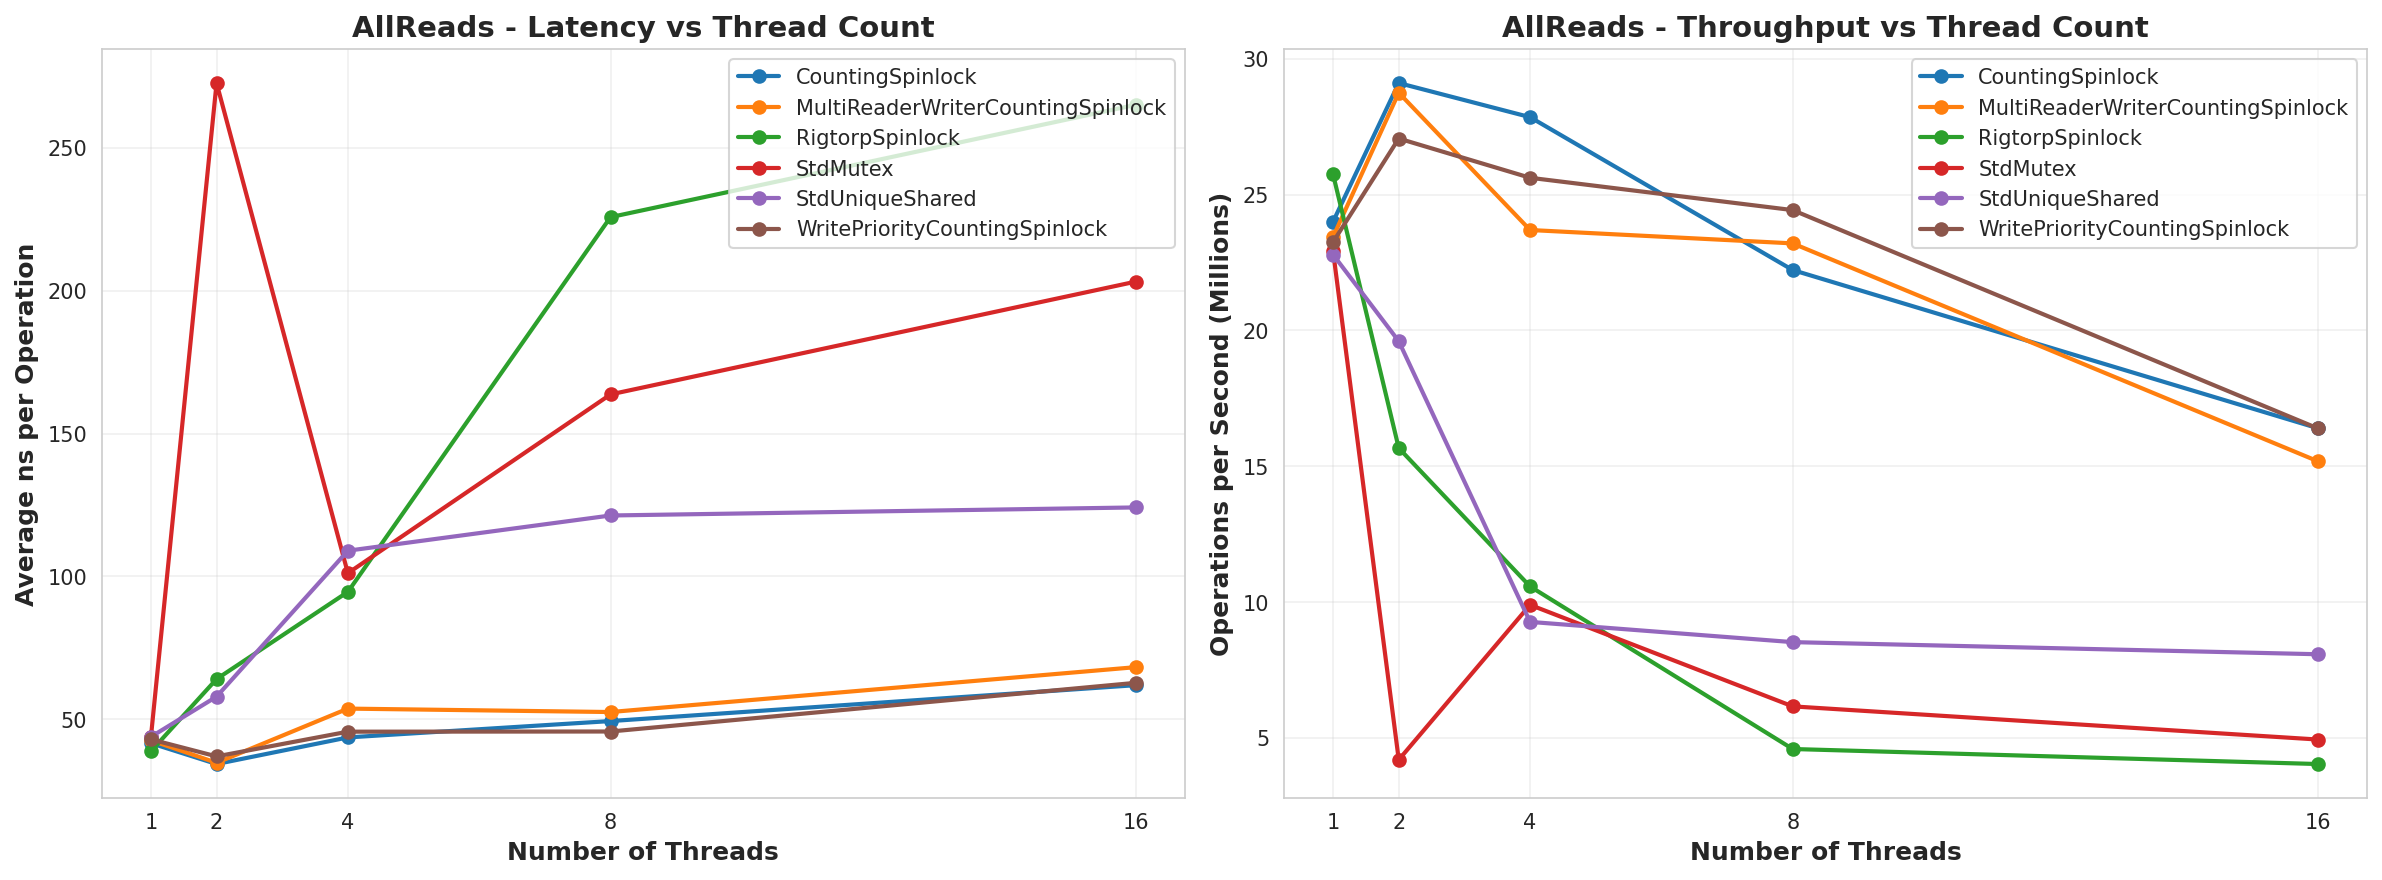
I tried using the lock free parallel linked list implementation created by Timothy Harris. I also tried using a simpler linked list that used atomic compare and swap interactions. But what I discovered was that, since a requirement is that insert, erase, and lookup can all happen in parallel, we always needed a lock of some kind on the linked list. Even the Timothy Harris algorithm needs a lock because it can logically remove items from the linked list in parallel, but it can’t physically destroy them in parallel. In my benchmark testing, it showed that having per-bucket locks generally adds more cost than using a global lock and doing the basic synchronous pointer operations. Because the cost of doing a read-only lock globally then another read or write lock on the bucket just ended up being more expensive than a single global write lock followed by the operation.
How you manage your memory has a major impact on the efficiency of the hash map
This might seem like an obvious comment, but in my tests I benchmarked the map’s performance both with and without an allocator I wrote. The reason I had the custom allocator was to allow for the use of pages of elements to reduce fragmentation and it also allowed me to have a consistent frame of reference in the benchmark. All that being said, the tests demonstrated that my custom allocator was significantly slower than the internal memory management mechanisms for the actual hash maps, and led to better performance in the custom hash map as opposed to the open source ones in some cases.
Locks are very expensive and atomic operations are fairly slow
This is another thing that probably seems obvious. But I found that I got better performance from having one lock and doing the operation synchronously than having a hierarchy of locks and using atomic operations. Part of the reason for the performance benefit is also probably that the logic gets much simpler and the optimizer can do a lot more work. I noticed this when I attempted to do per-bucket locking. While it allows you to potentially increase parallelism, the overhead of those operations trumps whatever gains you may get.
What did I end up testing
For available hash maps, I chose to test the following:
- std::unordered_map since it’s a good baseline
- Parallel Hash Map
- Chose this because the write up it had seemed interesting here.
- Tested both the node hash map
- Parlay Hash Map
- It has its own benchmarks claiming superior performance to all its competitors, so it’s a good thing to test.
- Of note is that it doesn’t fulfill our requirement for an allocator interface, but we’ll allocate our nodes on a separate pool type
- As a heads up, I actually had to abandon this hash map because it had issues with Clang with -O3 optimizations. Which I’ll cover later.
- Abseil’s Hash Map
- Chose this because it was used as the baseline for “Parallel Hash Map”. It’s built by Google and it stands to reason that they would have a good hash map implementation. There’s some other options made by other companies (like Meta and Microsoft), but the thing I liked about Abseil is it had a clean CMake interface and it didn’t require additional external dependencies.
- Tested both the node and flat hash map
Results
Issues with Parlay Hash Map
Parlay Hash Map simply did not work when I tested it. My suspicion is that it’s because I was working from Clang with -O3 optimizations turned on. One of the specific issues I saw is that the code has places where it does while loops checking for modifications to variables that happen outside the function scope. Clang has a habit of optimizing those functions to not re-read memory in those cases. The fix is often to mark variables as _Atomic or to use atomic instructions. Here’s a stack overflow post about it. Parlay Hash Map has several places that use it for some thread management logic and it was leading to infinite loops in some of the tests. So, you won’t see it in any of the actual benchmark results because it didn’t work in my setup.
Use Case Conflict with Parallel Hash Map
Parallel Hash Map is built for batching actions only. Which means you can’t read and write in parallel. If you do, like I attempted to do, then you get bad memory errors that you spend a lot of time digging into with the address sanitizer only to realize that you were misusing the data structure the whole time. So, that means, I needed to put a lock around it to meet my needs. The lock supported multiple readers and multiple writers, but it had a major impact on the performance of the data structure.
PklE Hash Map
This is the custom HashMap I wrote. The code is available on GitHub here. It’s a relatively simple hash map implementation. But it has a few key optimizations. Those optimizations being: nodes are allocated from a pool and the bucket list size is always a power of two. There is also code to break out separate inner-buckets, but as you’ll see in the testing, that actually decreased performance. I also attempted other optimizations to use atomic operations and per-bucket locking, but that also reduced performance. So, overall, we were left with a simple hash map where each bucket is a linked list of nodes and the bucket list is always a power of two.
Data
Tested Hash Maps
- AbseilFlatHashMapLocked – Default Abseil flat hash map with an external lock to manage concurrency
- To be consistent with our requirements, the values are all first allocated from a pool, the same one PklE Hash Map uses, then the pointers are stored.
- AbseilNodeHashMapLocked – Default Abseil node hash map with an external lock to manage concurrency
- AbseilNodeHashMapPagingAllocator – Abseil node hash map with an external lock. Allocator is a custom allocator that reserves fixed-size pages that can get reused.
- PhmapParallelFlatHashMapSpinlock – Default parallel flat hash map
- To be consistent with our requirements, the values are all first allocated from a pool, the same one PklE Hash Map uses, then the pointers are stored.
- PhmapParallelNodeHashMapPagingAllocator – Parallel node hash map using a customer allocator that reserves fixed-size pages that can get reused.
- PhmapParallelNodeHashMapSpinlock – Default parallel node hash map.
- PklEHashMap – Simple custom hash map described above. But split into two separate inner maps that each have their own lock.
- PklEHashMapLocked – Simple custom hash map described above, but there’s only 1 map, and all operations are done synchronously with a lock around it.
- StdUnorderedMapLocked – std::unordered_map with an external lock.
- To be consistent with our requirements, the values are all first allocated from a pool, the same one PklE Hash Map uses, then the pointers are stored.
Insert
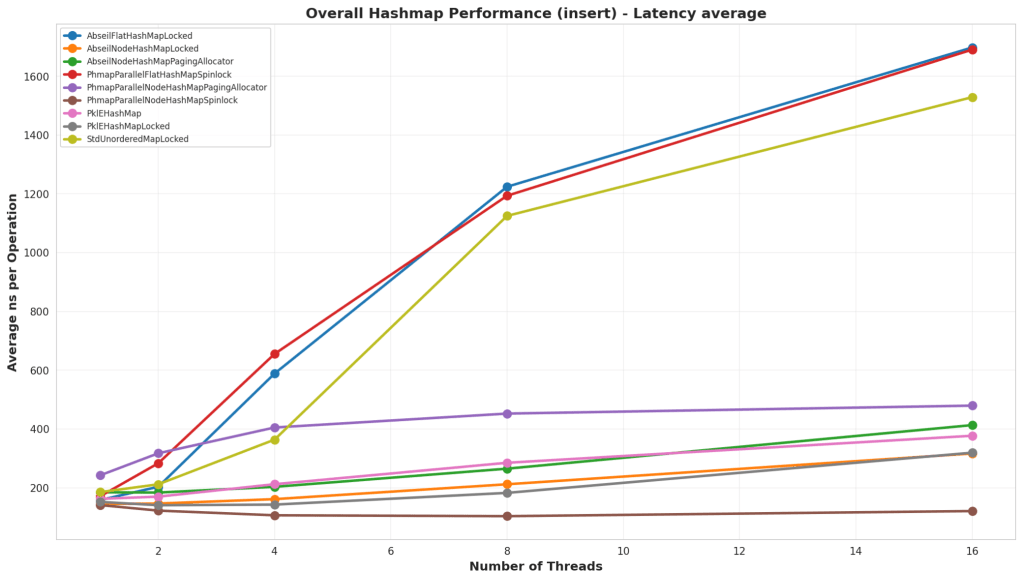
Test Structure
An empty hash map was populated with a large number of elements. Keys were chosen either as sequential numbers, or randomly. In the tests with random numbers, it was structured so that ~20% of the numbers would be collisions with existing values. For all tests, it was tested against both storing a 64 bit integer and a larger struct that contains several primitive types and an std::string.
Analysis
Overall, the default parallel node hash map shone itself to be significantly better than all the others at low and high thread counts. But interestingly enough, PklEHashMapLocked, which is just a basic hash map with an external lock, is on par with Google’s Abseil Hash Map in this test.
Batch Insert
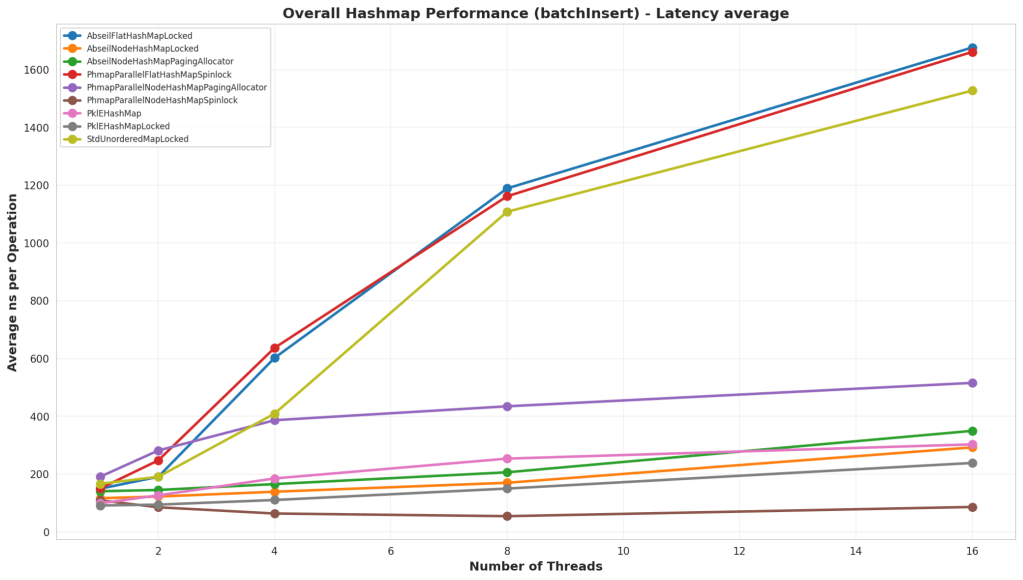
Test Structure
This test starts by reserving space in the map and then inserting entries. Similar to the other Insert test, it uses both sequential and random keys in different tests. The main difference is that memory is reserved ahead of time before inserting, and there is no external locking on parallel hash maps, since this is a supported use case for that data structure.
Analysis
Again, the default parallel node hash map out paced all the other hash maps. Interestingly though, is that the simple PkleHashMap actually beat the Abseil Node Hash Map in this case.
Contended Insert

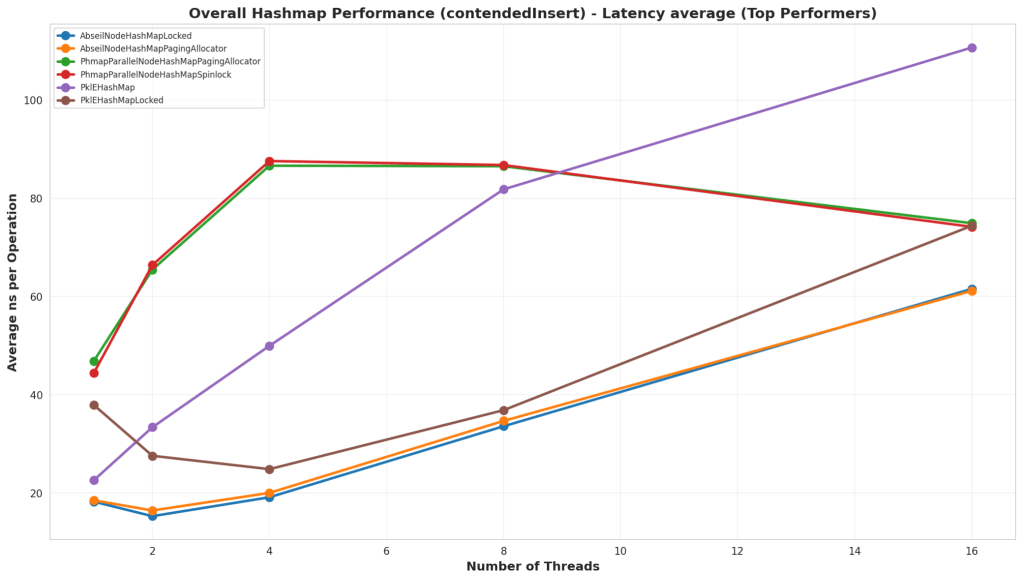
Test Structure
This test was an insert test on an empty hash map, but in this case 99% of the keys were conflicts. The goal of the test was to test the impact of inserting without doing a find first for certain bad data sets.
Analysis
Of note, is that all the hash maps with external storage via the pool ran terribly. That’s because they were still allocating nodes, attempting to insert them, then deallocating them when they failed. So I made a different graph that eliminated those. In the actual results, it looks like the Abseil Hash Map handles collisions better than all the others. Although, it looks like, if the thread counts continued to climb, then Parallel Hash Map would have overtaken it.
Erase
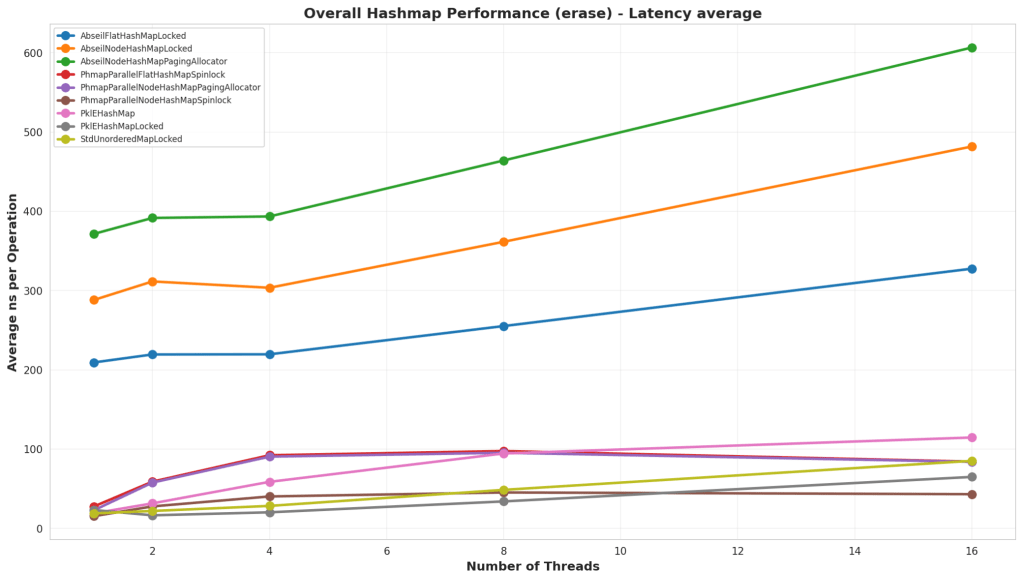
Test Structure
In this test, the hash map was pre-populated with a large number of nodes, and then they were erased sequentially or randomly based on the test.
Analysis
The default Parallel Hash Map continues to be the best performer at high thread counts, but what’s interesting is that at low thread counts, a lock on std::unordered_map or the simple PklEHashMap end up winning out. Although, they’re still fairly comparable until reaching 16 threads.
Lookup
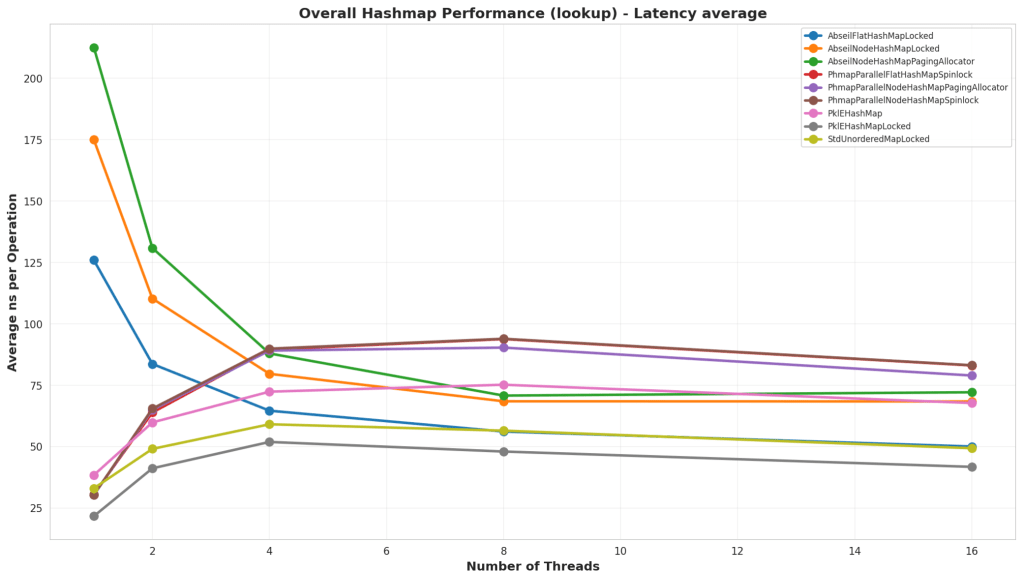
Test Structure
In this test, the hash map was prepopulated either with sequential keys or randomly. Then a lookup was performed both sequentially and randomly on the keys to test the lookup times on the map. The lookups all had a read-only lock though because we’re testing lookup times in the general case scenario where we still would need to be safe from inserts.
Analysis
In this test, the simple PklEHashMap ran faster than all the others. This is likely because it has no real extra meta data to manage internally. It’s basically a fast power-of-two mod then potentially a small linked-list traversal. Parallel Hash Map looks like it lost a lot of performance because of the additional external lock, but also there might be some internal meta data management that ends up taking more time.
Batch Lookup

Test Structure
Similar to the lookup tests, the only difference with these tests is that there’s no locking since it’s entirely read-only operations.
Analysis
In this version, we see std::unordered_map’s main advantages, and that is pure lookup times. But even it isn’t keeping up with PklEHashMap’s lookup times for the lower thread counts, and even at the high thread counts, it’s a toss up on which is actually faster. Of note, is that, while parallel hash map ran faster than in the standard lookup test, it’s still slower than the basic PklEHashMap. Which is fair to expect. It likely has extra meta data and tracking to parse through which impacts lookup times.
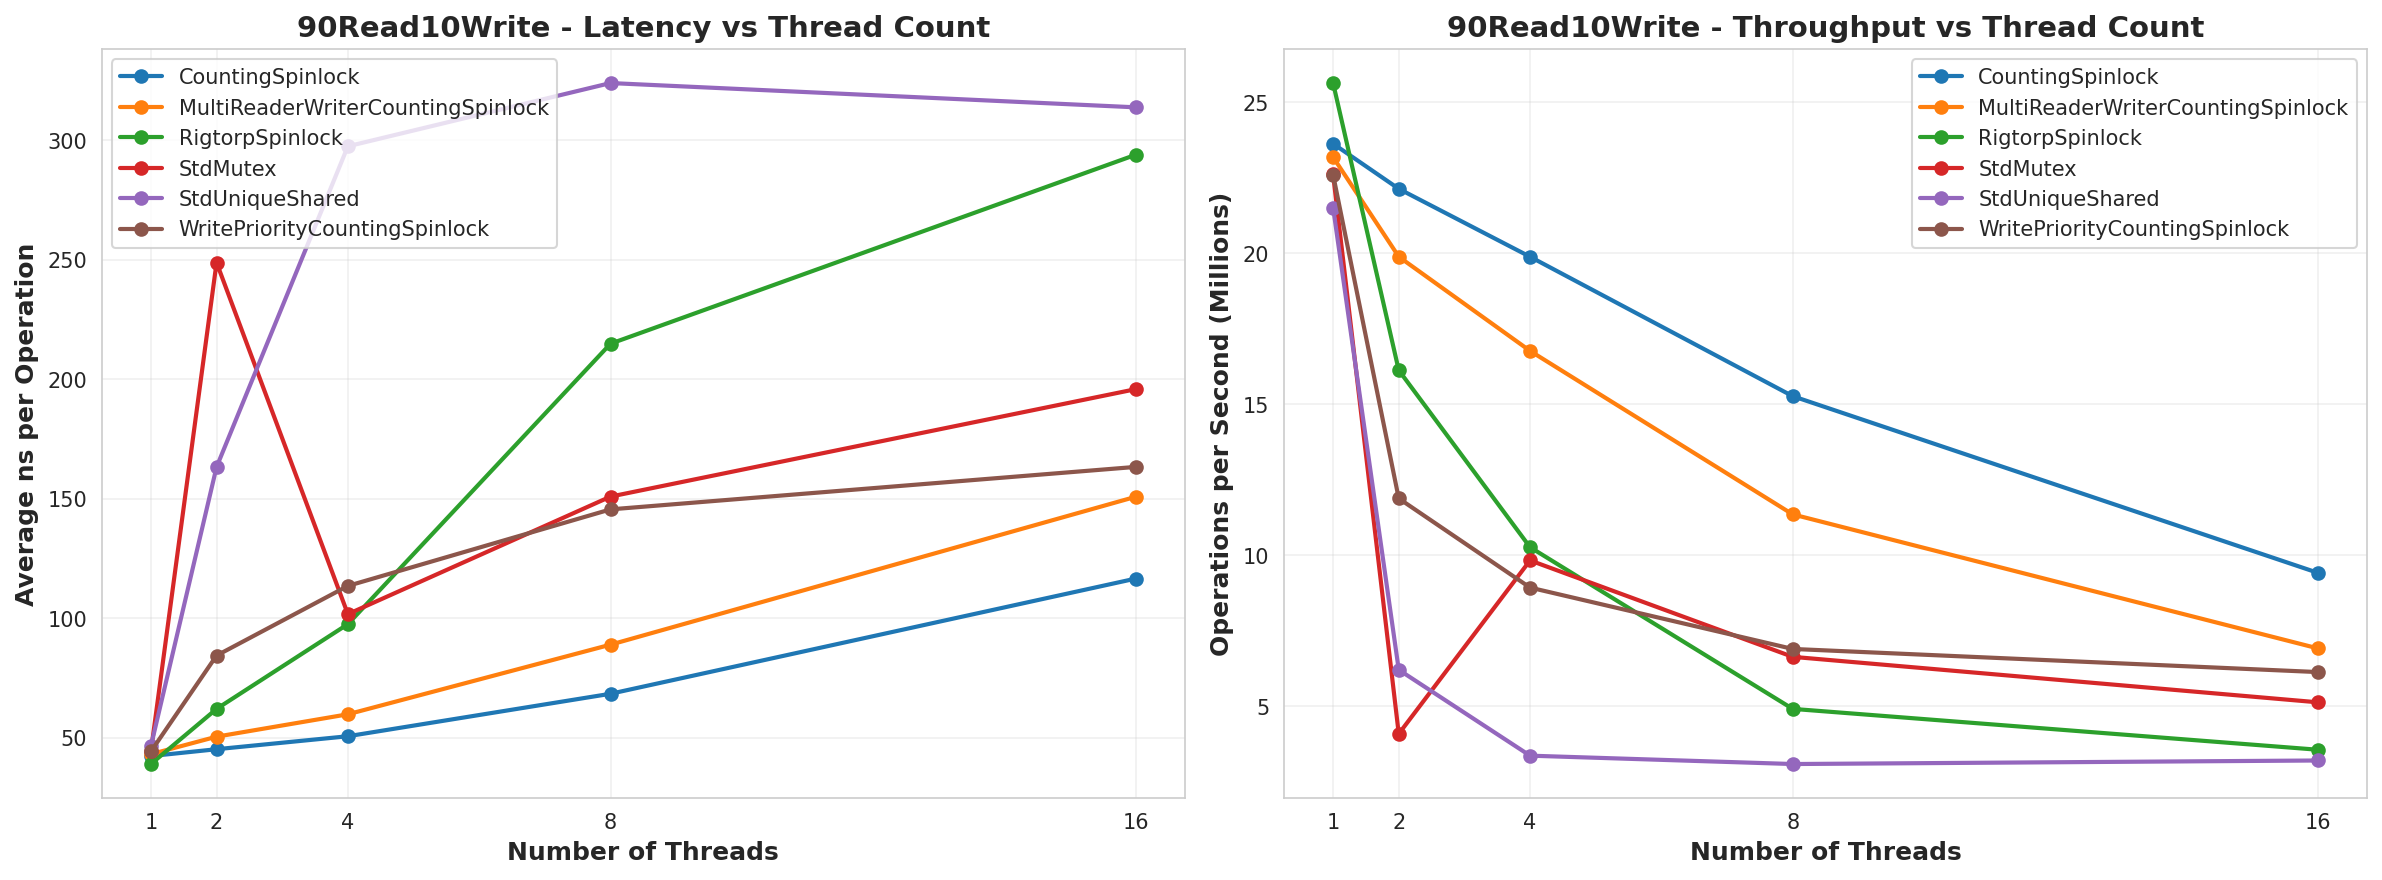
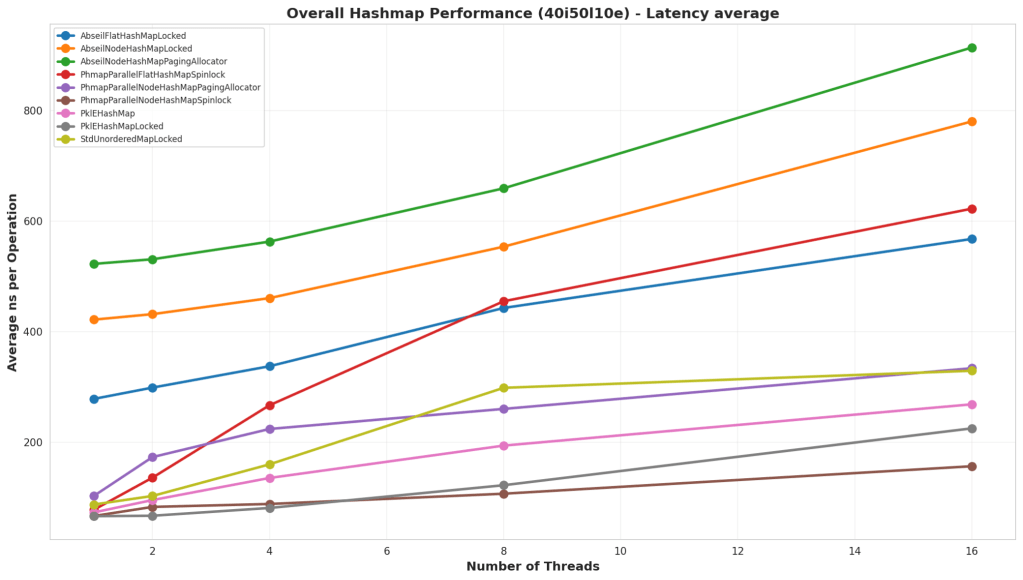
90% Reads 10% Writes

Test Structure
In this test, the hash map is partially preloaded with some keys, then we randomly perform reads and writes to the hash map. This case is 90% lookups and 10% inserts.
Analysis
Overall, for low thread counts, it would seem that the simple PklEHashMap is outperforming Parallel Hash Map. It stops performing best at 16 threads, but even then it’s at a comparable number. This case also shows that an std::unordered_map with an external lock performs pretty well if you have a low thread count and are mostly performing read operations.
50% Reads 50% Writes
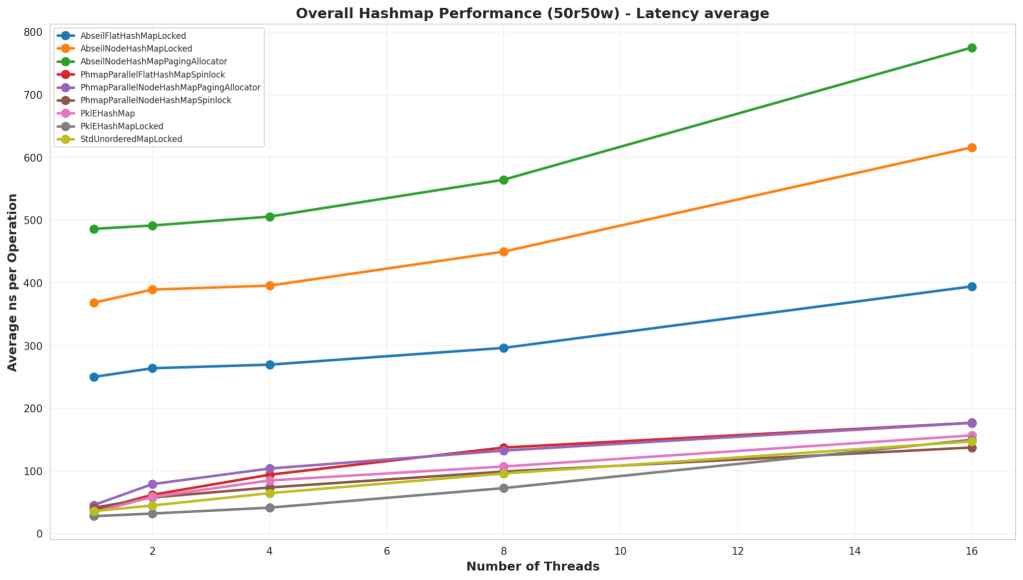
Test Structure
In this test, the hash map is partially preloaded with some keys, then we randomly perform reads and writes to the hash map. This case is 50% lookups and 50% inserts.
Analysis
Similar to the “90% Read 10% Write” test, PklEHashMap actually performed best. Although, once we hit 16 threads, it started to lose out again. It shows that parallel hash map seems to perform best for large thread counts, but it does not win at low thread counts or single threaded situations.
40% Inserts 50% Lookups 10% Erases
Test Structure
In this test, the hash map is partially preloaded with some keys, then we randomly perform reads and writes to the hash map. This case is 50% lookups, 40% inserts, and 10% erases.
Analysis
In this test, Parallel Hash Map is the clear winner. It has ways to safely delete nodes in parallel, and that allows it to run much faster than the other solutions. Although, again, at low thread counts, the simple PklEHashMap runs at a comparable performance.
Rekey
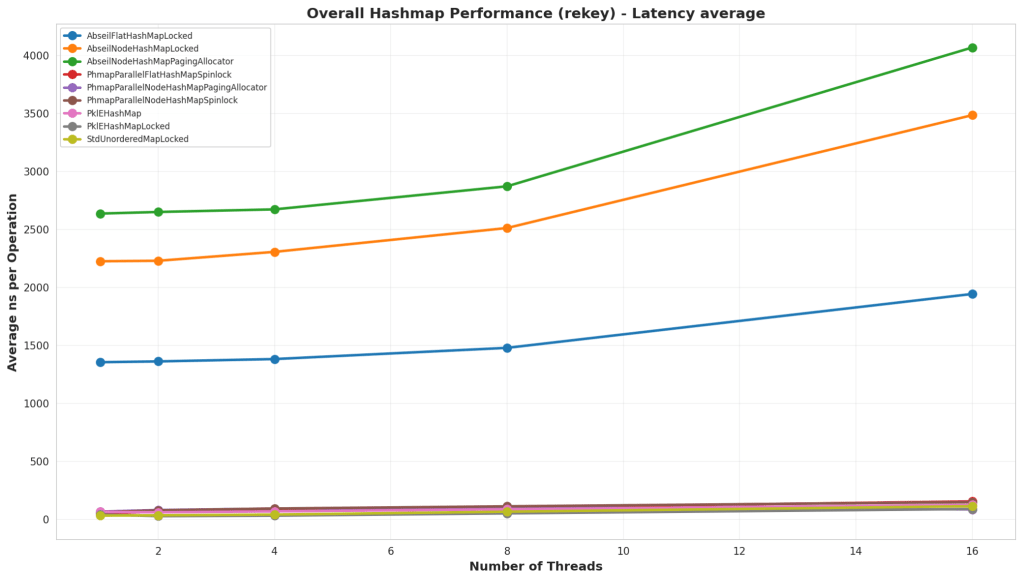
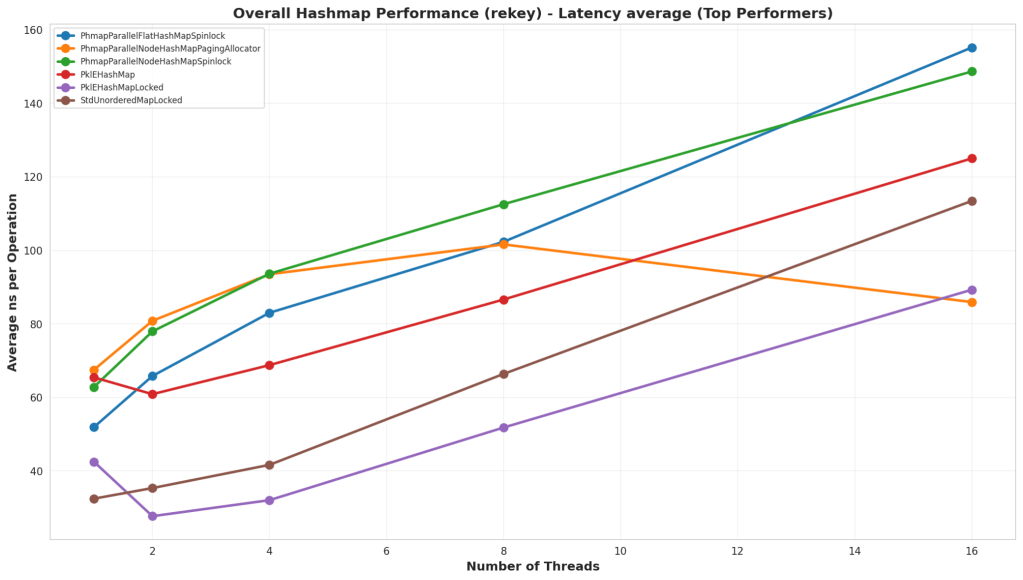
Test Structure
In this test, the map is preloaded with a large number of elements, and then all the elements have their keys changed to another unique key. This kind of operation is helpful for data structures like Spatial Hash Maps where the key might be a location, and the value is the data, and a moving element may change keys a lot.
Analysis
First thing to note is that the Abseil hash maps did not perform well in this test at all. I’m not sure why they did so badly, but it could be that this hits a particularly bad case in how the hash map works. What’s interesting is that PklEHashMap did far better than Parallel Hash Map, and that’s because I actually wrote an internal function for it whereas the Parallel Hash Map has to do a find, erase, and insert. PklEHashMap is simply moving the pointer containing the value from one bucket to another.
Iterator

Test Structure
In this test we pre-populate the hash map with a large number of elements, then we use the C++ iterator pattern to iterate over all the elements in the hash map. The iteration passes references to the key and value into a callback to simulate some work being done.
Analysis
In this case, PklEHashMap is faster than all the others. This is likely because PklEHashMap has a pool of elements and the iterator is iterating over the pool instead of the hash map. This approach seems to have produced faster iteration, potentially because there’s slightly better memory locality. That being said, I’m surprised Abseil Hash Map is performing worse than Parallel Hash Map. But Parallel Hash Map must have some optimizations that Abseil does not which lead to better iteration times.
Final Analysis
There were two implementations that seemed to be the top contenders, one was PklEHashMapLocked and PhmapParallelNodeHashMap. But they excelled in different situations, so it boils down a lot to what use case you have. But my overall read of the data is, if you don’t feel a need to worry about memory fragmentation or needing a custom allocator, then use Parallel Hash Map. If you have strict memory
Use Case Analysis: General Purpose Shared Hash Map
All around, I’d say that the default Parallel Node Hash Map would be the best option if you do not need any kind of custom allocator. But if you need to manage your own allocation in a way to avoid fragmentation or some other use case, then you may be better off writing your own simple hash map like PklEHashMap. The Parallel Node Hash Map generally was either first or second place, and it trended towards better performance with higher thread counts. The simpler PklEHashMap showed high performance in lookups, iteration, and rekeying, but did not scale as well with inserts and deletes.
Use Case Analysis: Global Data Store
Oftentimes, in games especially, you will have a global data store that will need to be accessed by systems at runtime. It’s an immutable store and the lookups are often done via some kind of hash key. In this case, a simple hash map like PklEHashMap is best because it has the best lookup times. Also, in some cases you’ll need to iterate over an entire data table to do runtime processing, and the iteration performance was best in this case as well.
Use Case Analysis: Spatial Hash Map
A Spatial Hash Map is a data structure where entities are stored with a key that is their location and a value of the data for that entity. Since these entities are moving, those keys will regularly need to get modified, but the values will not. In this case, PklEHashMap is ideal since it has fastest rekey times as well as fastest lookup times.
Use Case Analysis: General Purpose Local Hash Map
There’s still many cases where a hash map needs to be used in a purely single threaded environment, and while these benchmarks are not the best thing to reference for that decision. I’d recommend Parallel Hash Map based on this data. It seems to have a lot of optimizations in place that make insert and erase times much faster that simpler solutions like PklEHashMap, which is important many times for transient hash maps like a local hash map on the stack. That being said, I still recommend this benchmark for making a real decision on a general purpose single threaded hash map.
Should you write your own thread safe hash map?
In general, probably not unless you have a specific case to tune against. In my testing, I could create a hash map that was faster than Parallel Hash Map for lookups and rekey operations, but not really by that much. My recommendation is that most people should start by making a wrapper class around an existing open source hash map like Parallel Hash Map, and if they find that they have a bottleneck, then consider a more specialized version for that use case.
Where’s the code
The code is available on GitHub. It’s not packaged in a way where it can just be downloaded and used. But it’s packaged in a way where you could probably point Copilot or Claude or something at it to turn it into useful code. The reason for that is that I did this analysis for a personal project, and making a well-formed, clean library was more work than I wished to embark on.
GitHub Repo is here: https://github.com/PickledMonkey/ParallelHashMapBenchmark